
Multi-Floor Geometry and Vertical Awareness in Rainbow Six Siege
The TXCIZ Rainbow Six Siege Suite splits 5v5 multi-floor awareness across 10 Player ESP controls, 8 Screen Indicators, and 9 Radar and HUD Widgets on Windows 10/11 64-bit, isolating vertical floor threats and soft-wall silhouettes without flooding doorway sightlines across Clubhouse, Oregon, or Bank.
Stacked bomb sites compress footsteps and breaches across destructible ceilings, reinforced hatches, and concrete stairwells. Rendering full bounding boxes and health bars for anchors two floors away clutters narrow angles, whereas layered visibility filters expose only immediate entry threats.
Separating Direct Sightlines from Multi-Floor Audio Ambiguity
Assign each visual group a distinct tactical role so reticle space stays clean during rapid swings. Keep detailed bone skeletons active within 30 to 40 meters while relying on the corner radar and directional compass for distant rotations.
- 03. Player ESP (10 Settings): Renders 2D outline, corner, or filled boxes, smoothed skeletons, and operator names.
- 05. Screen Indicators (8 Settings): Projects top, center, or bottom snaplines and off-screen operator arrows.
- 06. Radar and HUD Widgets (9 Settings): Adds movable 2D radar, compass azimuth bars, and aim-vector threat alerts.
Operator ESP Modules: Boxes, Skeletons, and Visibility Colors
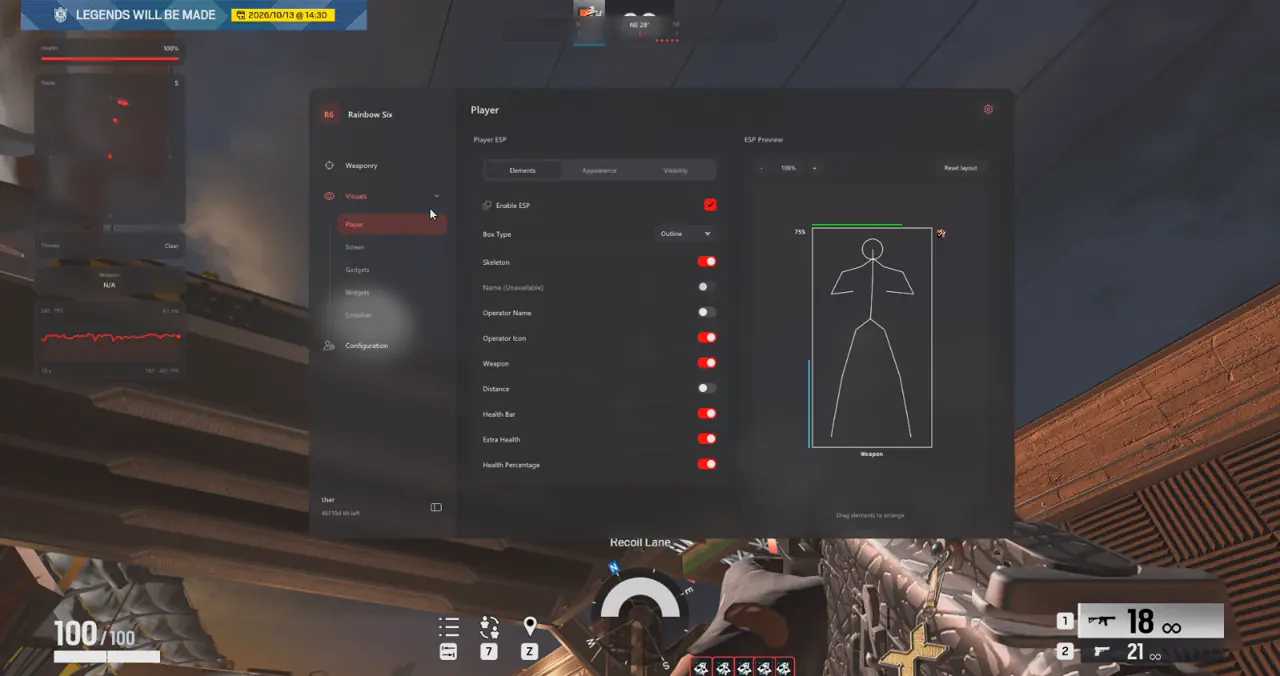
Player ESP tracks operator posture, distance, and identity in real time across soft walls and smoke. Selecting Corner Boxes paired with adjustable Skeleton Smoothness preserves silhouette clarity when defenders crouch-lean behind shields or hold prone pixel angles.
Visibility coloring prevents accidental shots into unbreakable concrete or reinforced metal panels. Assign bright green for exposed enemies and muted violet for occluded targets, or toggle Ignore Non-Visible during ranked stacks so skeletons appear only after an opponent clears hard cover.
Operator Icons, Weapon Labels, and Layout Preview
Drag-and-drop ESP Layout Preview lets you position operator icons, distance tags, and health bars cleanly outside the hitbox before entering live matches.
- Operator Names and Icons: Identify Pulse, Caveira, Solis, or Blitz early before committing to blind stairs.
- Distance Labels and Max Range: Cap player box rendering at 45 meters indoors to prevent distant spawn clutter.
- Health Bar and Percentage: Spot low-HP roamers after utility trades without tabbing to the scoreboard.
2D Radar, Compass Bar, and Off-Screen Threat Warnings
Movable 2D Radar and Compass Bar widgets expose stairwell flanks and late-round pinches without drawing screen-center text labels. Adjusting Radar Size, Scale, and Blip Radius inside 06. Radar & HUD Widgets keeps horizontal positioning compact above your ammo counter.
The Threat Warnings module monitors enemy aim vectors in memory and triggers directional edge alerts when an off-screen roamer aims toward your angle. Set configurable Screen Padding on Off-Screen Operator Indicators so directional arrows frame the screen perimeter cleanly.
- 2D Radar Horizontal Vector: Tracks ground-plane positions and doorway spacing behind soft site walls.
- Compass Bar Pitch Markers: Distinguishes operators holding vertical rafters or hatches above your current floor.
- Threat Warning Width: Alerts your peripheral vision the instant an unseen flanker aligns crosshair proximity.
Building Clean Attack and Defense Overlay Profiles
Role flips between Attack and Defense require distinct render ranges and indicator priorities, saved cleanly inside 08. Configs & Interface.
| Setting Category | Attacker Entry Setup | Defender Anchor Setup | Tactical Intel Objective |
|---|---|---|---|
| Operator Box and Bones | Corner Box + Smooth Skeleton (Visible Green, Occluded Red) | Outline Box + Subtle Head Dot (40 m cap) | Clear site entry angles vs holding tight pixel lines |
| Visibility Filtering | Dual Visible/Occluded Colors Active | Ignore Non-Visible Optional for Anchors | Spot soft-wall roamers vs avoid distraction through steel |
| 2D Radar Widget | Size 180 px, Scale 1.5x, Blip Radius 4 px | Size 220 px, Scale 2.0x, Blip Radius 5 px | Track stairwell pinches vs cover wide multi-breach flanks |
| Screen Indicators | Threat Warnings ON, Compass Bar OFF | Compass Bar ON, Direction Arrows ON | Protect entry crosshair vs monitor 360-degree vertical drops |
- Open 08. Configs & Interface in the
Insertmenu and create a clean baseline profile. - Configure 03. Player ESP with Corner Boxes, smoothed skeletons, 45 m max range, and distinct visible vs occluded colors.
- Position the 06. Radar & HUD Widgets panel in the top-left HUD margin at 180–220 px with Threat Warnings active.
- Save separate Attack_Entry and Defense_Anchor profiles to swap cleanly between side switches.
- Pair trap visibility using our Rainbow Six Siege Trap Chams and Drone Guide.
Refine headshot micro-aim next in our Rainbow Six Siege Aimbot, Occlusion and Curves Guide, or inspect live plan options and BattlEye status on the Rainbow Six Siege Product Page.
Prerequisites, Expected Outcome and Fast Triage
Verify Windows configuration and live build availability on the Live Cheat Status dashboard before launching Ubisoft Connect, Steam, or Epic Games Store.
Pre-Launch Readiness and Common Fixes
Follow the unified 6-step flow on our Windows Setup Guide whenever Windows restarts or Ubisoft pushes a seasonal patch.
- Prerequisites: 64-bit Windows 10 or 11 (24H2–26H2), 8 GB+ RAM, Windowed or Borderless display at 100% scale, Step 2 security switches OFF.
- Expected Outcome: Pressing
F2at the Main Menu triggers an injection beep;Insertopens all 8 tabs cleanly while OBS Game Capture stays StreamProof. - Fast Triage: If
Txcizware-Loader.execloses or shows0x00000001, redo Step 2 after reboot, run Time Sync now, enable CloudflareWARP(1.1.1.1), and launch as Administrator.
Continue refining defender recon with our Rainbow Six Siege Trap Chams and Drone Guide and Rainbow Six Siege Aimbot, Occlusion and Curves Guide, check Live Cheat Status and the Windows Setup Guide, or compare plans on the Rainbow Six Siege Product Page.

